


Contract Bridge didn’t just arrive. It exploded. The 1930s saw it take off as an international rage, sweeping through clubs and living rooms with a fervor that hasn’t quite faded. Today, many consider it the ultimate card game. Even veterans who have played for decades admit there is always another layer to peel back.
If you want to join the ranks of the dedicated, you need to understand the mechanics. This isn’t just about luck. It’s about strategy, communication, and memory. We are going to break down the basics of Contract Bridge rules, focusing on the three pillars: bidding, playing, and scorekeeping.
Once you grasp the core regulations, you can look at variations like Auction Bridge, Honeymoon Bridge, Reverse Bridge, and Three-Handed Bridge. But first, let’s master the auction. Because without a solid bid, the game doesn’t exist.
The Setup and Object
Contract Bridge is strictly a four-player game. You sit as two pairs. Partners sit directly across from each other. Tradition dictates the names: North-South and East-West. It’s a geographic convention that helps keep track of who is talking to whom across the table.
The object seems simple enough on paper. Following an auction, you score points by taking tricks during the play. Your goal is to eventually win a “rubber,” which means winning two games. It’s not just about one hand. It’s about endurance.
You need a regular 52-card deck for each deal. Smart players keep a second pack ready. Why wait for the shuffle when you can be ready for the next hand immediately? Efficiency matters in serious play.
How the Play Begins
The sequence is rigid. Once all cards are dealt, the dealer begins the auction. This is the bidding phase. Silence falls. Then, voices speak numbers and suits.
When the bidding stops, the actual play begins. There are exactly 13 tricks in a hand. No more, no less. Every card you hold has a role in those 13 tricks. Miss one, and you might lose the contract.
Understanding the Bidding
Most card games use auctions. But most are brief. Simple. You bid, you match, you play.
Bridge is different. The auction in Contract Bridge rules is creative. It is complex. It is a coded language.
The bidding is where partners communicate their hand strength and distribution without saying a word about specific cards.
This complexity is why the game retains its die-hard fans. It’s not just playing cards. It’s solving a puzzle in real-time while your opponent tries to throw you off balance.


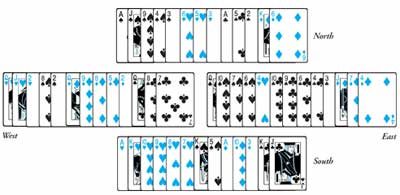
The auction starts with a classic pass-out. West deals and stays quiet. It is not their hand, or at least, not their kind of hand. North steps up. They open the bidding with 1♠.
East passes.
South, holding the strength to push forward, bids 2♠. West passes again. North is not done yet. They jump to 3♠. East passes. And then South drops the hammer: 6♠.
It is a slam contract. Six spades. No hearts. Just spades and the hope that the rest of the deck plays nice.
The Psychology of the Bidding
Why does this specific sequence matter? It is not just about points. It is about fit.
When North opens 1♠, they are saying, “I have a spade suit.” South responds with 2♠. This is not a game try. It is an invitation. Or perhaps a confirmation. Then North jumps to 3♠. This shows extra values. A good hand.
South hears that. South sees the fit. South knows that if North has a solid spade suit and some high cards, six is not just possible. It is probable.
“Bridge is a game of communication. Every bid is a sentence. Every pass is a period.”
The Problem with 6♠
Six spades is aggressive. It assumes no heart losers. It assumes the club suit can be managed. It assumes diamonds are not going to break badly.
In many cases, this is too much. The diagrammed deal, as presented in standard bridge literature, often highlights a specific trap. Players look at the points and the fit and think, “We have enough.” They forget about the heart suit.
If North and South have a heart loser they cannot ruff, or if the defense finds the heart lead early, 6♠ goes down. It is not just about having the cards. It is about controlling the suit before the opponents do.
How to Avoid the Trap
The key is in the response to 3♠.
If South has a singleton heart, the bid of 6♠ makes sense. If South has doubleton hearts and no ace, it is risky. If South has no hearts at all, it is almost certain to go down.
Most players miss this detail. They see the spade fit and ignore the side suits. They bid slam because they can. But bridge punishes carelessness.
What Happens Next?
Once 6♠ is bid, the play begins. West leads. East follows. The declarer (South) must decide whether to draw trumps immediately or manage the side suits first.
If the hearts are not controlled, the defense can cash out. One heart lead. Two. Maybe three. Then spades are drawn. Too late.
This is why the auction is studied. It is not just a sequence of numbers. It is a warning. A lesson in restraint. Or perhaps a lesson in overconfidence.
Depending on the full hands, 6♠ might make. But often, it does not. The difference is in the details. The small details. The ones you forget when you are excited about a slam.
The game moves on. The hand is

South is aiming for the top spot, hunting down 12 of the 13 available tricks. It’s a bold call. The table stays silent. The other three players pass. South moves first to make that decisive bid.

For the winners of the bidding war, the role of declarer is secured. They get to play the hand at a contract of 6. In Bridge, the game begins with a crucial step. Both sides bid for the right to choose the trump suit. Or they decide to play no-trump (NT). The dealer starts the process. A bid consists of a number from 1 to 7. It also includes a suit.
The winning bidder becomes the declarer, setting the contract level and trump suit.
Understanding the Bidding Structure
The dealer makes the first move. This initiates the auction. Players take turns in clockwise order. Each bid must be higher than the previous one. This creates a competitive tension. You are not just stating a number. You are making a promise. A bid of “1” means you promise to take at least seven tricks. A bid of “6” means you promise twelve. The number seven is the baseline. You need to win at least the contracted amount plus six extra tricks to make the contract.
Why the Number Matters
The number you bid dictates your strategy. A low bid is safe but yields few points. A high bid is risky. If you fail, the penalties are severe. This is why the bidding phase is as important as the play. It allows partners to communicate without speaking. They share information about their hand strength. They signal where the tricks might be found.
Choosing Trump or No-Trump
Once the bidding ends, the highest bidder becomes the declarer. Their partner becomes the dummy. The declarer chooses how to play the hand. They have two main options. They can choose a specific suit as trumps. Hearts, diamonds, clubs, or spades. This gives them control. Cards in the trump suit beat any other suit. Or they can choose no-trump. This means no suit has special power. Winners are determined by the highest card in the led suit.
The Dealer’s Starting Position
Why does the dealer start? It adds variety to the game. The dealer’s hand distribution often influences the opening bid. A balanced hand might lead to a no-trump bid. A hand with a long suit might start with a suit bid. This initial move sets the tone. It forces other players to react. They must decide whether to bid higher. Or to pass and let the auction end.
Strategic Implications
Bidding is not just about luck. It is about logic. Players must evaluate their cards. They count high cards. They look for lengths. A strong hand might jump to a higher bid. A weak hand might pass. This filtering process helps the partnership find the best contract. Playing at 6 requires precision. One error can lose the hand. The declarer must plan the play carefully. They need to visualize the opponents’ cards. They must execute a specific sequence of plays to fulfill the promise made in the bidding.
What Happens Next?
After the contract is set, the play begins. The player to the left of the declarer leads the first card. The declarer plays from their hand. The dummy is then laid face up. The declarer controls both hands. This is the unique aspect of Bridge. One mind directs four cards. The goal remains the same. Take enough tricks to make the contract


The foundation of bridge isn’t just about having good cards; it’s about communication through the auction. When you bid, you aren’t just guessing. You’re calculating.
In contract bridge, the number you bid, added to six, tells you exactly how many tricks your partnership must take if that suit becomes trumps. It’s a simple math problem with high stakes.
Each round gives you a choice. Bid. Or pass.
The strategy is straightforward. If your side holds more cards in a specific suit than the opponents, bidding that suit increases your chances of winning tricks. It’s about leveraging length.
Essential Bridge Vocabulary
Before you can master the auction, you need the language. The terms can feel like a foreign dialect at first. Here is the glossary you need to navigate the table.
The Core Players
– Auction : The bidding phase where partners negotiate the number of tricks to be taken.
– Contract : The specific number of tricks the declarer promises to win.
– Declarer : The player who wins the auction and leads the first card from their hand to fulfill the contract.
– Dummy : The declarer’s partner. Once play begins, the dummy’s hand is laid face up on the table, controlled by the declarer.
Bidding Actions
– Double : A bid that increases the score or penalties. It’s a challenge.
– Overcall : A bid made by a player after an opponent has already opened the auction.
– Raise : Increasing the level of a suit your partner has already bid. It shows support.
– Rebid : Your second call in the auction.
– Redouble : Doubling a double. A high-risk, high-reward move.
– Response : Your call immediately after your partner opens the bidding.
Hand Shapes and Status
– Major : Hearts or Spades. These suits are worth more points.
– Minor : Diamonds or Clubs.
– Singleton : Holding exactly one card in a suit.
– Void : Holding no cards in a suit.
– Vulnerable : A side that has already won one game in a rubber.
– Not Vulnerable : A side that hasn’t won a game yet.
Game Outcomes
– Rubber : A match consisting of two complete games.
– Set : To defeat the contract. To fail to make the promised tricks.
– Ruff : To trump. Playing a card of the trump suit when unable to follow suit.
– Undertricks : The number of tricks the declarer falls short of the contract.
– Table : Another word for the dummy’s displayed hand.
The Bottom Line
The auction is where the game is won or lost before a single card is played. Understanding these terms isn’t optional. It’s the difference between chaos and strategy.
The lowest possible bid starts at 1. But knowing what that “1” means—what suit, what level of risk, what partnership agreement—is what separates casual players from those who actually win.
The cards are dealt. The auction begins. Do you speak up? Or do you pass?


Understanding Bridge Bidding Levels and Suit Rankings
A contract in bridge isn’t just a promise; it’s a specific mathematical deal. If you bid 4 Clubs, your side agrees to take at least seven tricks using clubs as trumps. It’s that simple. Change the suit, and the target shifts. 1 Diamond signals a need for seven tricks with diamonds. Jump to 3 Diamonds, and suddenly you’re aiming for nine. 3 No Trump (3NT) is the wildcard here: nine tricks, no trump suit to save you.
The auction can technically open with any bid, depending on your hand. But once the first bid hits the table, the rules tighten. Players take turns passing or bidding. You can also double or redouble, which adds pressure. Every new bid must outbid the previous one. You can’t just repeat yourself. You have to climb higher.
Here’s where it gets tricky for beginners. The new bid doesn’t always need to increase the number of tricks. You can stay at the same level but switch to a higher-ranking suit. The hierarchy runs low to high: clubs, diamonds, hearts, spades.


Suits drop down in rank starting with spades at the bottom.
Hearts sit right above them.
Then comes diamonds.
Clubs take the third spot.
Notrump claims the top.
It’s simple. The suits order themselves alphabetically. Clubs, diamonds, hearts, spades. You can’t get much easier than that.
But where does notrump fit? It beats them all.
In Bridge, notrump is the highest ranking suit of all.
This hierarchy matters because it dictates bidding priority. If you’re trying to remember which suit beats which during a game, just think alphabetical order for the cards. Notrump stands alone at the peak. It’s the only option that doesn’t follow the a-b-c-d pattern. It’s the wildcard king.
Why does this matter for your next hand? Knowing the order prevents confusion when you’re trying to determine the winning trick. It’s one of those foundational rules that keeps the game from turning into chaos. Skip it, and you’re guessing. Learn it, and you’re playing.


If you’re staring at a hand of cards and wondering where to start, the first thing to understand is hierarchy. In contract bridge, not all suits are created equal. Spades and hearts are called majors. Diamonds and clubs are the minors. This distinction matters because it affects scoring and strategy later on.
When you have a strong hand, you can push past the basics. If you go to a higher number of tricks, you can bid in any suit or no trump (NT). It’s a way of saying, “I can handle this alone” or “My cards are too scattered for a specific suit.”
Who Calls the Shots?
The bidding phase ends the moment three consecutive players pass. That’s it. No more arguments. No more haggling. The last bid made becomes the final contract. It’s binding.
But who actually plays the hand? The declarer is determined by partnership strategy. Specifically, the partner who first bid the winning trump suit becomes the declarer. In the scenario we’ve been looking at, South takes that role. Why? Because South was the one to bid the suit that ended up winning the auction. Now South has to plan the play, while North sits quietly and follows the rules as the dummy.

Watch your partner’s hand. Seriously. Don’t let any opponent peek at your cards during the auction. It’s basic etiquette and basic strategy.
If your opponent makes the most recent bid, you have a choice. You can double. Just say the word. This doubles the stakes. If you make your contract, you win double the points. Your risk? Also doubled. Either opponent can then redouble. Three passes end every auction. The final contract might be doubled or redoubled. That changes the score significantly.
How to Count Bridge Points for Beginners
Bidding confuses everyone at first. It’s overwhelming. But making intelligent bids is key to winning. You won’t master the nuances quickly. Whole books exist on this alone. Skip the fine points for now. Here are the basics.
First, arrange your hand by suit. Assign points to your cards:
- Aces: 4 points
- Kings: 3 points
- Queens: 2 points
- Jacks: 1 point
- Singleton (one card in a suit): 1 point
- Void (no cards in a suit): 2 points
Add them up. Look for your strongest suit. You want 4-5 cards in a suit with at least 1-2 high cards to bid it as trump. If you have 16-18 points and an even distribution across suits, consider bidding no trump.
When to Open the Bid
Open a bid only if you have 13 or more points. It’s that simple. Unless your partner has already bid. If they open, they have sufficient points. They are asking if you can support their suit or introduce a new one.
If you support their suit, you need 6-8 points. If you introduce a new suit, aim for 8-10. If your partner passed and you have less than 13 points, pass too. Don’t risk it.
Calculating Team Strength for Slams
Bid back and forth with your partner. Figure out your combined points. Here is the cheat sheet:
- 28+ points: Bid 4
- 33 points: Bid 6
- 36 points: Bid 7 (grand slam)
These are the essentials. Other conventions exist, but this covers the basics.
Reading Opponent Signals
Every rule has exceptions. Pay attention to opponents. They might bid a suit that is strong in your hand. What do you do? You have to decide if you let their bid go through and try to set them. Or do you win the contract yourself? Earning game points is the goal.
Now that you understand the auction, you’re ready to play the hand.
The Opening Lead and Dummy
The bidding is done. Play begins. The player to declarer’s left chooses the opening lead. In our sample, West leads first.
Once the lead is made, the dummy hand goes on the table. This is declarer’s partner. North in our example. North is now functionally out of the round. Declarer plays both hands. South rearranges the dummy to show trumps.

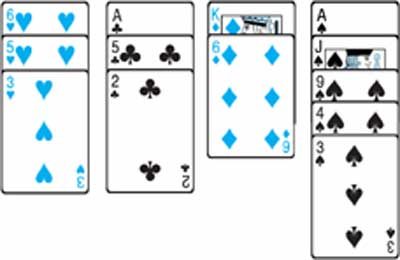

The dummy’s cards lie face up on the table. It looks like they’re playing themselves, but they’re not. When it’s the dummy’s turn to contribute to a trick, declarer calls the shot. You point to a card. The dummy plays it. This isn’t a glitch in the matrix. It’s rule number one.
Declarer controls both their own hand and the dummy’s. But there’s a catch. You have to follow suit. If the lead suit is hearts, you must play a heart. Unless you’re void. If you have no hearts left, you’re free to dump anything. Any card. Including a trump card if you have one.
Who wins? The highest card in the led suit wins. Unless someone plays a trump. Then the highest trump wins. Simple math. The winner of the trick leads the next one. This chain reaction continues until all thirteen tricks are played.
If the dummy wins a trick, the lead returns to the board. Declarer must then call a card from the dummy to start the next trick. You can’t just reach over and pull a card from your own hand.
This brings us to the opening lead. Once that first card hits the table, everyone must follow suit if possible. Deficient? No problem. Play what you want. But here is where most beginners stumble.
When is it legal to lead trump?
You can’t just start blowing trump cards around for fun. Not until the trump suit is “broken.” Broken means someone has played a trump on a trick where another suit was led. Or when someone ruffs. Once trump is broken, you can lead with it. Unless you’re void in another suit. Then you can lead trump anytime, even before it’s officially broken.
Consider this practical scenario. Imagine West leads the Jack of Spades. East plays the Queen. Dummy throws the King. Declarer holds the Ace. Who takes the trick? West leads. East follows. Dummy plays. Declarer plays. The highest card wins. West leads next.
This isn’t just about cards. It’s about control. Declarer controls the dummy. The dummy controls the board. The board controls the next lead. It’s a cycle. A loop. A game of logic played with paper rectangles.
But wait. What happens if you don’t have the suit led? You’re void. You can ruff. Or you can discard. Discarding is safe. Ruffing is risky. You need to know who holds the high trumps. You’re guessing. Blindly. Until the next trick.
The rhythm of bridge is predictable. Lead. Follow. Win. Lead again. But the content of the cards? That’s chaos. That’s where the skill lies. Reading the voids. Counting the high cards. Knowing when to break trump. And when to wait.
It’s not magic. It’s memory. And timing.
The dummy never speaks. The dummy never leads unless it wins a trick. Declarer does all the talking. All the thinking. The dummy is just a pair of hands with a brain located elsewhere.
This structure ensures fairness. You can’t cheat by looking at the dummy’s cards and adjusting your own play in real-time. The dummy is static. Fixed. The declarer is dynamic. Moving. Adapting


Let’s look at the position. South leads the Ace of diamonds at trick two. East drops the Jack. That should be fine. Then comes the King at trick three. East shows out.
The defense wins a trick with the Queen.
Why did this happen? It’s a classic suit-break problem. South assumed the diamonds were splitting 3-3 or that East held the Ten. But East held the Queen singleton or doubleton? No, wait. If East shows out on the second round, East started with three diamonds. Or maybe two?
If East started with Q-J-x, the play is tricky. South cashes the Ace, East plays the Jack (or false card). Then South plays the King. East drops the Ten or small? If East shows out on the second round, East had Q-J-x. The Queen is still out there.
Actually, let’s simplify. If East wins with the Queen, it means South failed to recognize the blocking issue or the location of the honor. Did South try to finesse? No. South cashed high.
This is why cashing winners too early can be fatal. You reveal the shape of the hand. East’s Queen was guarded. Or maybe East had Q-x and South’s A-K are now useless because the suit is blocked in dummy? Or maybe South has A-K-10-9 and East has Q-J?
If East has Q-J, and South cashes A then K, East drops the J then what? If East had Q-J-2, South’s 10 becomes a winner? No, if East shows out on the second round, East had three cards. Q-J-x. The Queen is still master.
So South loses a trick to the Queen. The defense takes it.
This happens often in bridge tutorials. It’s a lesson in counting the hand and not assuming the worst-case scenario until it’s too late. Did South know East had the length? Probably not. That’s the risk of playing from the top without information.
The East hand is the villain here. With the Queen in the right spot, South’s plan collapses. It’s a reminder: check the signals. Watch the discards. Don’t just cash winners.
Key Takeaways for Bridge Players
- Cashing high honors can reveal suit length.
- If an opponent shows out early, recalculate honor locations.
- The Queen often hides in places you don’t expect.
South thought it was over. It wasn’t. The Queen remains. And with it, the defense takes control. It’s a sharp lesson in declarer play.


West holds the Queen. It’s a beautiful card. It’s a winning card. But in this specific bridge deal, West made the decision to discard their Jack and Two, leaving the Queen tucked away in reserve. A bold move? Maybe. A costly one? Absolutely.
South didn’t blink.
At the fourth trick, South leads the three. It goes to dummy’s King. The play is simple. The consequence is immediate.
The Trap of the Reserved Queen
Why did West keep the Queen? Maybe they were planning a finesse later. Maybe they thought South was weak in that suit. It doesn’t matter. The reality is that by holding back, West allowed South to control the tempo.
When South leads the three, dummy’s King takes it. West’s Queen is still lurking. But the initiative has slipped away. South isn’t worried about the Queen anymore. They’ve already secured the trick with the King.
This isn’t just about one hand. It’s about a pattern. Players often hoard high cards hoping for a better moment. But bridge punishes hesitation. If you don’t use your strength when it matters, you lose the chance.
What Happens Next?
The hand continues. South is now in a position to dictate the next moves. West has a Queen that might win a trick later, but only if South plays into it. South won’t. Not now.
The three led by South was a probe. A test. Dummy’s King answered. The Queen remains in reserve, a ghost of a potential win that may never materialize.
West’s mistake wasn’t discarding the Jack and Two. It was keeping the Queen too tight. In bridge, as in life, holding on too long can cost you more than letting go.
South smiles. They know it’s over. Not the hand, but the battle for that suit. The King stood firm. The Queen stayed back. And the trick was won by the player who played first.


The play gets weird here. South leads the three to dummy’s king. West is trapped in a spot. If they don’t cover, the king wins the trick outright. But let’s say West does cover. They drop the queen. Now South has a choice. Do they let it ride? No. South trumps it in dummy with the remaining trump card.
It’s a standard squeeze. Except for one thing. West’s high card. That queen wasn’t just a cover. It was a signal. A warning. Or maybe just a mistake. Either way, it changes the geometry of the hand. South didn’t just win the trick. They forced West to reveal their hand. And now? The defense is exposed.

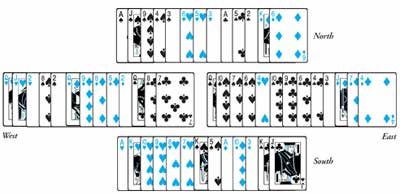
South wins every single trick. The contract holds. It succeeds.
You’ve seen the bidding. You’ve watched the play. Now comes the part that actually matters. Keeping score.
Contract Bridge scoring is not intuitive. It takes some getting used to. The rules are strict. The rewards are specific. Here is how you calculate points after the cards are played.
Made Contracts and Slams
First, look at the outcome. Did the declarer make the contract? That means taking at least the number of tricks they bid for. If yes, they score points. If no, they go down and lose points.
But there is a special tier. A higher tier.
If you bid six tricks and make them. That is a small slam. You get a bonus.
If you bid seven tricks and make them. That is a grand slam. You get an even bigger bonus.
Both slams receive these bonuses. But there is a catch. A strict catch.
You must bid the number.
If you win six tricks but only bid four. You get nothing. No slam bonus. No credit.
If you win seven tricks but only bid five. Again. Nothing.
The scorebook does not care about your accidental success. It only cares about your declared intention. You have to commit to the height of the contract. Then you have to hit it.
The Score Table
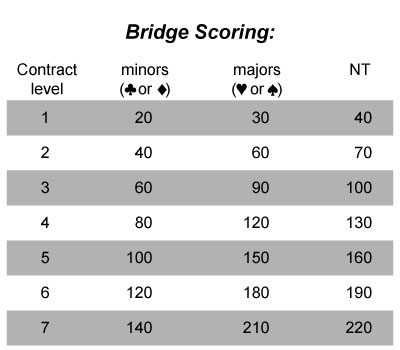
The points for a made contract depend on the suit and the level. Hearts and Spades are major suits. They pay more. Clubs and Diamonds are minor suits. They pay less. Notrump has its own scale.
| Contract Level | Major Suit (per trick) | Minor Suit (per trick) | Notrump (per trick) |
|---|---|---|---|
| 1 | 30 | 20 | 40 |
| 2 | 30 | 20 | 40 |
| 3 | 30 | 20 | 40 |
| 4+ | 30 | 20 | 40 |
Wait. That table is simplified. The real math involves game bonuses and part-score accumulation. But the base trick points follow this pattern. Major suits are worth 30 points each. Minors are 20. Notrump starts at 40 for the first trick and adds 30 for each subsequent one.
This is why bidding four Hearts or Spades is valuable. It gets you to 120 points. That is a game. Five Clubs gets you only 100. Not a game.
You need to know the difference. Because the bonuses for a game are substantial. And they change how you play the hand.
Going Down
What if you fail?
If the declarer goes down, the defending side scores penalty points. These depend on whether the contract was doubled or redoubled. And whether the vulnerability is in play.
Vulnerability is a key term. It means your side is “vulnerable” to big losses or big gains. It changes the risk profile.
If you are not vulnerable and you go down one trick. The opponents get 50 points. Two tricks down? 100.

When you’re deep in the weeds of a bridge hand, the mood shifts the moment a double lands on the table. You aren’t just playing for tricks anymore. You’re playing for survival.
If the contract collapses, the penalty points stack up fast. This isn’t about making your bid. It’s about how much damage you can inflict when the other side overplays their hand. These are the “below the line” scores that define the risk of doubling.
The Cost of Failure
When a doubled contract goes down, the non-declaring side scores points for undertricks. This is the number of tricks the declaring side falls short of their contract. The math is punitive. It scales. And it can end a game before it starts.
Here is how the penalty points accrue for the defending side based on the vulnerability status of the declaring side:
- Not Vulnerable: The first undertrick costs the declarer 100 points. The second and third each cost 200. Any subsequent undertrick beyond the third also costs 200 per trick.
- Vulnerable: The stakes are higher. The first undertrick is still 100 points. But the second and third each jump to 300. Every undertrick after that costs 300.
This structure is why doubling a contract you think you can beat is so dangerous. One extra trick against you can flip the scorecard. Three tricks down when vulnerable? That’s nearly 1,000 points in penalties. It’s enough to lose the match.
Why Vulnerability Changes Everything
Vulnerability isn’t just a label. It’s a multiplier.
When you’re vulnerable, the penalty for failure increases significantly. The defending side gets more points for every trick you miss. This forces declarers to be more cautious. It makes doubles more attractive to defenders.
If you’re not vulnerable, the penalties are milder. You can afford to be a bit looser with your doubles. But if you’re vulnerable, one mistake is costly. The chart below summarizes the exact point values for undertricks in doubled contracts:
| Undertrick Number | Not Vulnerable | Vulnerable |
|---|---|---|
| 1st | 100 | 100 |
| 2nd | 200 | 300 |
| 3rd | 200 | 300 |
| 4th and beyond | 200 | 300 |
This table is your quick reference. Memorize it. Or at least keep it in mind before you slam your hand on the table to double.
The Psychology of the Double
Doubling isn’t just math. It’s a message.
When you double, you’re telling your partner and opponents that you believe their contract will fail. You’re betting on their weakness. But you’re also betting on your own defense. Can you actually take those tricks?
If you double and go down, the points pile up. Fast. If you don’t double, and they make their contract, you get nothing but frustration. The risk is real. The reward is huge.
So when you’re sitting at the
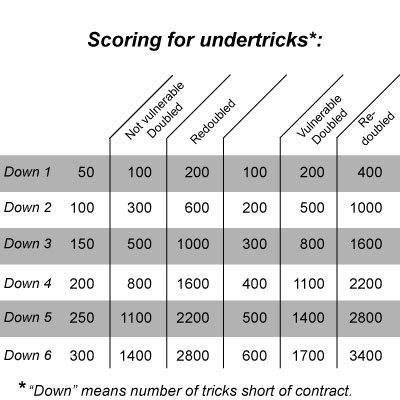

If the contract collapses, the opposition racks up points for undertricks based on the chart. It’s the penalty side of the coin.
The Path to Winning a Rubber
Rubber bridge moves on a simple hierarchy. When one side secures two games, they win the rubber. A game requires scoring 100 points in tricks bid for and actually won. You don’t need to grind out a marathon hand to get there. It is entirely possible to bid and make game on a single deal.
How Games Score
Look at the numbers. Three no-trump scores 100 points. Successful contracts of four hearts or diamonds also hit that 100-point threshold for game.
The math is straightforward.
- 3 NT = 100 points
- 4 H/D = 100 points (below the line)
Any contract below the game level—like 1 NT or 2 Spades—does not count toward the two games needed to win the rubber. But the points still matter. They count toward the final tally if the rubber ends because of time or other constraints.
“A game means 100 points in tricks bid for (and won).”
Why Undertricks Matter
If you bid 4 Spades and take only nine tricks, you go down one. The other side scores for that undertrick. It’s not just about your success. It’s about their gain when you fail. The chart dictates exactly how much they take.
This dynamic keeps players honest. You can’t just bid wildly. You need to calculate the risk. One undertrick can wipe out a small part of your previous game bonus.


Understanding the Points and Partial Contracts in Bridge
In contract bridge, the math matters. You need at least 100 points to claim a game. This threshold isn’t just a random number. It’s the baseline for rewarding serious bids. But not every winning hand requires going for the high-stakes game. You can also earn points through a series of deals where the final contracts end at a lower bidding level.
These are called part-scores. Or partials. They add up. They keep you in the game without risking a costly overbid. Consider a specific scenario. You might bid and make 2. This is a modest contract. It yields points, but not game points. It’s a strategic foothold.
The distinction between a part-score and a game is stark. A part-score might look like 2 of a major suit. It’s safe. It’s incremental. A game, however, demands more. It requires the full 100 points. This is why players often trade off. They might accept a part-score now to set up a stronger hand later. Or they might gamble on a game if the risk is calculated.
“A part-score is a stepping stone, not a destination.”
This strategy is common in competitive play. It prevents bankruptcy. It builds momentum. You don’t always need the big win. Sometimes, just staying in the black is enough. The bid determines the risk. The result determines the reward.
Consider which path makes sense. A low-level contract is predictable. A high-level one is volatile. Players who master partials understand this. They know when to push. They know when to hold back. It’s not just about points. It’s about timing.
The game isn’t won by every bid. It’s won by the ones that stick. A made 2 is a made 2. It counts. It adds to the tally. But it doesn’t trigger the game bonus. That’s reserved for the higher stakes. Knowing the difference is half the battle. The other half is knowing when to fold.


You start with forty. You bid again and grab twenty more. That is one hundred points total. It is enough for a game.
Now the rules shift. Once you have scored a game, you become vulnerable. This status sticks. If your opponents have also scored a game, they are vulnerable too. Both sides are at risk. But if you have not scored a game yet, you are not vulnerable. You are safe from the increased penalties.
This vulnerability matters. It changes the math when you defend. If you set a contract, you earn more points if the other side is vulnerable. The stakes are higher. The risk is real.
Doubles change everything too. Score for the winning side jumps when the final contract is doubled or redoubled. These multipliers punish bold bids. They reward precise defense.
Overtricks do not count toward game. You can win extra tricks all night. It does not help you reach the game threshold. The focus remains on the contract itself.
How Bridge Players Track Points
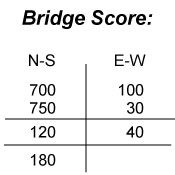
Most pairs use a preprinted Bridge score pad. It is standard. It is clean.
Some players just draw lines in a cross on any paper. It is messy. It works. Both sides keep score. This is non-negotiable. You cannot play blind. You need to know where you stand.
Vulnerability dictates the cost of failure. It dictates the reward for success. Without it, the game loses its tension. The math becomes flat.
Which side is vulnerable next round? It depends entirely on who scored first. The history of the match lives in those lines. Or that pad.
“Extra tricks made at any contract do not count toward game.”
The structure holds. The points add up. But the strategy? That is where the real work begins. You know the numbers. The board is set. What do you do with them?

How to Score Bridge: Above and Below the Line
You know that moment in contract bridge when the scoring feels like deciphering a foreign ledger? It’s not just about who wins the hand; it’s about where the points land. The rules are rigid but logical. Points that count toward making a contract—the base game—are recorded below the line. Everything else? The bonuses, the overtricks, the penalties for failing to deliver? They live above the line.
A horizontal line separates these two worlds.
Think of it this way. Below the line is the primary objective. If you bid 1NT and make it, you get 40 points below the line. You haven’t “won” the game yet, but you’re putting the markers there. If you go further. If you bid 4 and make it, that’s game points below the line.
But what about the extra tricks? The ones you didn’t bid for but took anyway? Those score above the line. They don’t help you close the contract. They’re just profit.
Real-World Example: 1NT to 2NT
Let’s look at a specific hand. East-West bid 1NT. They made it. So, 40 points go below the line. But they didn’t stop there. They pushed to 2NT and made that too. Now they have 60 below the line (two tricks at 30 each). Wait, no. 1NT is 30. 2NT is 60 total. But in the diagram we’re discussing, the score is 40 below and 30 above.
Why?
Because the first trick of a new suit or NT counts 30. The second trick? It’s an overtrick. It scores 30 above the line. So, East-West has 40 below the line for the contract (1NT made twice? No, that’s not how it works. Let’s stick to the text’s specific example).
The text says: E-W bid 1NT and made 2NT. They score 40 below the line and 30 above for the overtrick.
This implies they made the 1NT contract plus one extra trick. The 1NT contract is worth 30 or 40 depending on vulnerability, but the standard 1NT is 30 below. If they made 2NT, that’s 60 below. But the example splits it. 40 below. 30 above. This suggests a non-vulnerable 1NT (30) plus an overtrick (30) or a vulnerable 1NT (40) with no overtrick? No, the text explicitly says “30 above for the overtrick.”
So, 40 below the line. 30 above.
Then North-South bid 4.
They went for game. A slam? No. Just game. 4 of a major suit is 100 per trick. 4 hearts or spades is 400 below the line. If they make it, they get 400 below. If they go down? They lose points. But they didn’t go down. They made it.
So, North-South get 4

The scoreboard shifted again. After another 120 points rolled in, the winner’s line appeared under the total. But here is where the math gets tricky if you aren’t paying close attention. E-W’s previous 40-point part-score? Gone. Wiped clean. They earned those points for the trick, sure. Both sides get the credit. But the next game starts from zero. No carry-over. Just a fresh slate and 100 trick points needed to close out the deal.
N-S looked at the board. They didn’t hesitate.
They bid 3.


The other pair didn’t have it that night. They slid down one trick, giving East-West a modest 100 points above the line. Not much to write home about.
Then North-South took the helm. They bid six. And they made it.
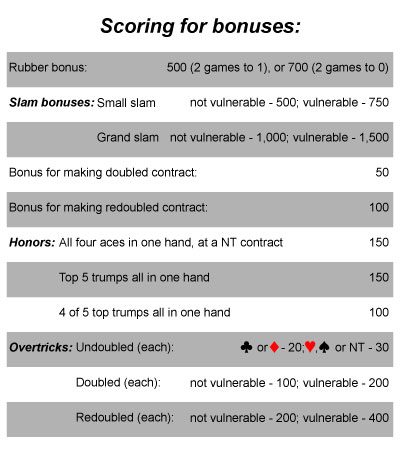
The math gets interesting here. Trick score landed at 180 below the line. That’s the base. Then came the bonuses. A vulnerable small slam nets you 750 above the line. Big. But wait. They won the rubber. Two games to none. That’s another 700 points above the line.
Add it up. North-South finished with 1,750. East-West, struggling in their one-trick deficit, held 170. A lopsided night.
Here is how those bonuses and overtricks usually break down.
Understanding Slam and Rubber Scoring
When you look at duplicate or rubber bridge scoring, the distinction between what goes below and above the line matters. Trick score stays below. It’s the foundation. Bonuses jump above. They’re where the real margin is built.
Vulnerable small slam bonus is 750. Non-vulnerable is 500. The gap is significant. It forces players to evaluate risk differently. One makes you hesitate. The other encourages the bid.
Then there’s the rubber game bonus. If you win two games before your opponents, you get 700 points. If you lose the rubber, you still get 300 points for completing a game. The asymmetry punishes the loser heavily. It’s not just about making contracts. It’s about closing the deal.
Overtricks also play a role. They add to the trick score below the line. But they don’t get the slam bonuses. They’re just pure volume. A well-timed overtrick can swing a close match. A missed slam opportunity can end a night.
Key Scoring Categories
- Trick Score : Points for each trick bid and made. Stays below the line.
- Vulnerable Small Slam : 750 points above the line.
- Non-Vulnerable Small Slam : 500 points above the line.
- Rubber Bonus : 700 points for winning two games; 300 for losing but making a game.
- Overtricks : Counted in trick score. No extra bonus unless specified by specific variant rules.
The numbers don’t lie. But they do demand attention. One misjudged vulnerability can cost you hundreds. One confident slam can win you the match.


The Ancient Art of Scoring Points
Contract Bridge isn’t just about playing cards. It’s about memory. It’s about noticing who didn’t follow suit on the first trick. That’s where the game begins for most people. You start counting. Thirteen. That’s the magic number. Thirteen cards in a suit. Thirteen dealt to you. Thirteen tricks up for grabs. Get comfortable with that number. It’s the heartbeat of the game.
More books exist on Bridge than any other card game. Seriously. The library shelves sag under the weight of bidding styles and card-play tips. It’s a deep well. But once you understand the layers, you play it for life. And there are other ways to play. Variations that survived or died trying.
Auction Bridge: The Pre-Contract Era
Auction Bridge had its moment. Roughly 1900 to 1930. Then Contract Bridge stole the show. It still has fans though.
- Players: Four.
- Goal: Score points.
- The Deck: Standard 52-card deck.
Here’s the difference. In Contract Bridge, your score depends on the contract you bid. In Auction Bridge? You just need enough tricks to win. Game and slam bonuses apply regardless of how high the bidding went. The auction and play rules mirror Contract Bridge. The scoring is where it breaks away.
Auction Bridge scoring evolved. This final version is what stuck. A rubber ends when one side hits two games. A game is 30 points in trick-score. Simple? No. Precise? Yes.
Other Variations on the Table
We’re not done. The Bridge family tree is sprawling.
Honeymoon Bridge
This one’s a two-player game. It’s intimate. It’s fast. You don’t need a table. You don’t need partners. Just you, your opponent, and a deck. The bidding is different. The play is different. It’s Bridge distilled.
Reverse Bridge
Here, the roles flip. Or at least, the perspective does. The scoring and bidding structures are tweaked to change the strategic landscape. It forces you to think differently about control.
Three-Handed Bridge
Sometimes you have three players. Or one person drops out. Three-Handed Bridge adapts. It removes one hand. Adjusts the bidding. Keeps the core logic intact. It’s less about partnership and more about individual calculation.
Why These Variations Matter
You might ask why anyone plays these old or niche versions. The answer is strategy. Each variation highlights a different aspect of the game.
- Auction Bridge emphasizes raw trick-taking power over contract precision.
- Honeymoon Bridge tests solo decision-making under pressure.
- Reverse Bridge challenges your understanding of role inversion.
- Three-Handed Bridge forces adaptation without a fixed partner.
They aren’t just relics. They’re training tools. They break you out of Contract Bridge autopilot. If you’re stuck, try Auction Bridge. You’ll notice how much you relied on the contract system. If you’re bored, try Honeymoon. It’s faster. Sharper.
The Core Skill: Remembering
None of these variations change the fundamental requirement: remember the cards played. It’s hard at first


In Auction Bridge, the stakes are immediate. You score 6, 7, 8, 9, or 10 points per trick depending on the suit or No Trump (NT) designation. These points go below the line. The first side to hit 30 wins the game. Then you reset. Win two games to take the rubber and pocket a 250-point bonus.
Slams change the math. Grab 12 of 13 tricks for a 50-point small slam. Sweep all 13 for a grand slam and add 100. Doubles and redoubles multiply the trick score. Miss your contract? You pay. Undoubled failures cost 50 per trick. Doubled? 100. Redoubled? 200. Overtricks at doubled contracts bring in 50 each. Redoubled overtricks? 100 each.
Honors pay out too.
You get 30 points for holding any three of the top five honors in trump (Ace, King, Queen, Jack, 10). Four honors in trump nets 40. Five honors divided between partners? 50. Hold four trump honors in one hand? 80. Four in one hand with the fifth in partner’s? 90. Five trump honors all in one hand? 100.
At NT, it’s about aces. Three aces split between hands? 30 points. Four aces split? 40. Four aces in one hand at NT? 100 points.
The bidding isn’t as complex as Contract Bridge. You’re buying the contract cheap. You might not find the perfect suit. But keep looking for tricks. A game or slam is always possible.
Honeymoon Bridge
This is the go-to for couples. Two players. Sit side-by-side. Not opposite.
Dealer deals four hands. Each player has their own hand and a dummy hand for their partner. The deal is specific. Two rows of three cards face down. One card face up on top of each face-down card. The last card sits face up next to the rows.
Bidding mirrors normal Bridge. A single pass ends the auction.
Play is where it gets weird. Each player controls the cards in their partner’s dummy hand across the table. Declarer’s left leads first. You only play from the exposed cards in the dummy. Once the trick is done, flip over any uncovered card in that dummy. That new card is now playable.
It’s strategic chaos. You’re managing two sets of cards while seeing parts of your partner’s.
Reverse Bridge
Four players. Same rules as Bridge. Opposite goals.
You try to force opponents to take the tricks for the bid you make. If you bid 4, you want them to win four tricks. Your side wins if they fail to take them.
It flips the psychology of the game entirely. You’re no longer trying to save your contract. You’re trying to sabotage theirs by making them look good.
“The object is entirely the opposite: You try to force opponents to take the tricks for the bid you make.”
Does this actually work in practice? Or does it just make you paranoid about every lead? The scoring remains standard, but the intent warps every decision. You lead high not to win, but to force. You discard not to protect, but to mislead.
It’s a fun twist. A good way to break the monotony of standard play. If you’ve mastered the art of the bid, try inverting it. See if you can lose on purpose. It’s harder than it looks.


The goal here is brutal in its simplicity. You need your side to take at least 10 of the 13 available tricks.
With hearts as trumps, the stakes shift. You get to keep the score for any contract you successfully force the opponents to make.
Strategy breaks the rules of standard Bridge. Don’t hoard high cards to save for later tricks. Instead, play the highest card you can that you are certain will still lose the trick. It sounds backward. It feels wrong. But it works.
When your side actually takes a trick, dump high cards on it from both hands. Save your losing cards. Use them to disrupt the play later in the hand.
Three-Handed Bridge
Waiting for a fourth player to show up is a pain. People have found ways to play with only three. It isn’t the real thing. Close, though.
Number of players: Three
How to play: Deal four hands. Leave the fourth hand on the table opposite the dealer. This is your dummy. Turn up four cards from that hand.
Players bid for the right to become declarer. You sit opposite the dummy. The other two players defend.
Dealer starts the bidding. Two passes end it. Shift seats if needed. Put the declarer opposite the dummy hand.
After the opening lead, turn up the face-down dummy cards. Declarer sees them. Now they can plan a line of play.
Scoring: Same as Contract Bridge. Complicated. You are tracking three scores. A contract may be doubled. Or redoubled. That applies to the two players involved. The third player scores for an undoubled contract.
You know two variations on four-handed bridge. You know the versions for two and three players. There is no limit now. You will be an impressive player before you know it.
Bridge Game FAQ
How many players are there in bridge?
Four. Playing as two pairs. Partners face each other. Tradition calls the pairs North-South and East-West.
How do you win bridge?
Each partnership tries to score points. Bid. Or defeat the opposing partnership’s bid. At the end of play, the partnership with the most points wins.
How do I play bridge online with friends?
Download Fun Bridge on smart devices. Play with friends.